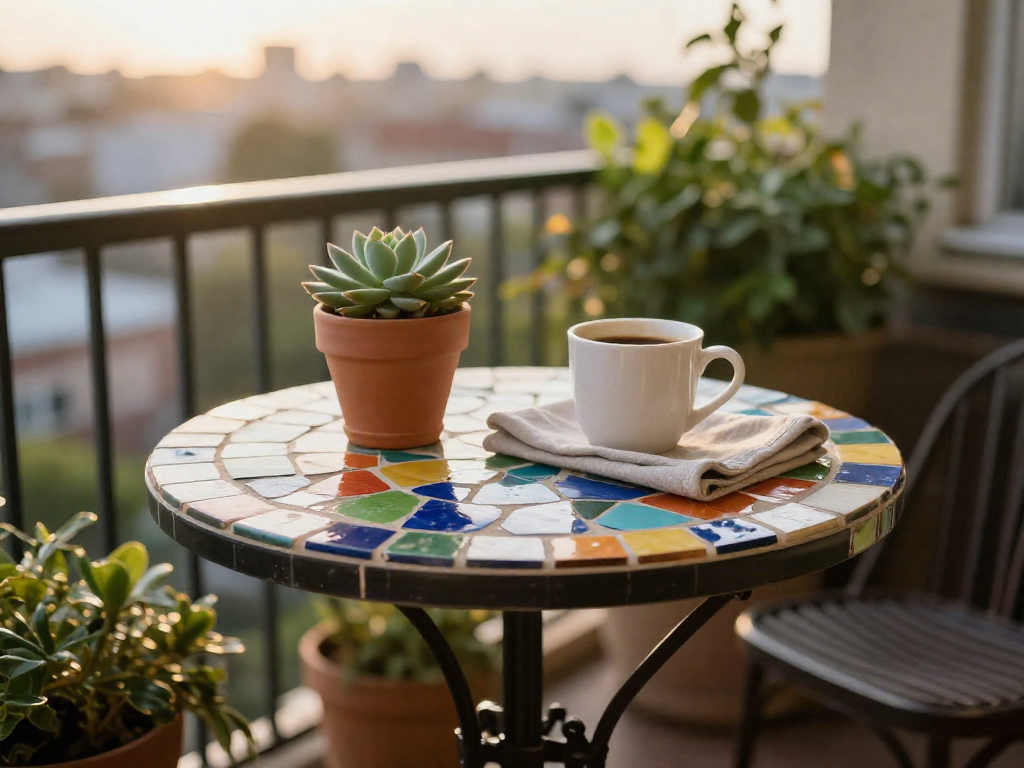
Broken Plate Mosaic Table Top for a Colorful Balcony Accent
Transform a thrifted table into a one-of-a-kind balcony bistro centerpiece using chipped plates and simple mosaic techniques. No art skills needed—just creativity and a little patience.
Gather Materials & Tools
Before you start, collect everything you’ll need. Thrift stores, online marketplaces, and community freecycle groups are treasure troves for this project—embrace the hunt for broken or chipped ceramic plates in a rainbow of colors and patterns. A secondhand small table with a flat top (wood or metal base) makes the perfect canvas. For safety, you’ll need tile nippers (or a hammer wrapped in an old towel to contain shards), thick gloves, and safety glasses to protect against sharp edges. Strong outdoor-rated construction adhesive like Liquid Nails or a dedicated mosaic adhesive will secure your pieces, while sanded grout in a complementary shade adds a finished look (pre-mixed saves effort). Gather a grout float, a sponge, and a bucket for easy cleanup. Finally, an outdoor clear sealer—acrylic or polyurethane—shields your colorful creation from sun and rain, keeping it vibrant season after season.
Prepare the Table Surface
To make sure your mosaic masterpiece withstands balcony weather, take time to prep the table. Start by lightly sanding the top with fine-grit sandpaper—this scuffs up any glossy finish so the adhesive can grip better. Wipe away all dust with a damp cloth, then let the surface dry completely.
If your table has a slick laminate top, apply a thin coat of bonding primer with a disposable brush. This extra step prevents tiles from popping off later. Let the primer dry according to the product instructions.
Check if the table has a raised rim. Keeping it creates a natural border that contains your design; removing it allows tiles to flow over the edge for a more organic look. If you choose to remove it, use a chisel or multi-tool carefully, then sand the edge smooth.
While you wait for the primer to dry, consider painting the table legs and sides a coordinating color. This frames your mosaic beautifully and adds a polished touch to your balcony accent. Use exterior paint for added durability against sun and rain.
Design and Arrange Your Broken Plate Mosaic
With your table surface prepped and materials at hand, it’s time for the most creative step—designing your mosaic layout. This is where those broken plate pieces transform into art. Don’t rush; a well-planned arrangement makes all the difference.
Start by sorting your shards. Spread them out and group by color, pattern, or even texture. Set aside larger, striking pieces—they can serve as focal points, like the center of a flower or a bold geometric anchor. Smaller bits will fill in the gaps.
Now, play with your design right on the dry table (no glue yet!). Try different approaches: - Geometric: Arranging shards in stripes, chevrons, or concentric shapes for a modern look. - Floral burst: Radiating pieces from a central focal point like petals. - Random patchwork: A lively, eclectic mix that celebrates the varied patterns. - Picture scene: Perhaps a simple silhouette—a bird, a leaf, or an abstract shape.
If you’re aiming for an intricate pattern, tracing a rough template on newspaper or kraft paper can help. Lay the paper over your table, sketch your idea lightly, and then place the shards on top to see how they fit. Adjust until it feels right.
As you arrange, remember to leave a consistent gap of about 1/8 inch between pieces. These spaces will later be filled with grout, giving your mosaic a clean, finished look. A popsicle stick or a piece of cardboard cut to size can serve as a handy spacer.
Once you’re happy with the layout, take a clear photo from directly above. This will be your reference map when you start gluing, so you can recreate the exact arrangement without guesswork. It’s a simple step that saves a lot of frustration later.
Above all, let your balcony’s personality shine through. Whether you go bold and bright or subtle and harmonious, this mosaic top will become a unique accent that sparks conversation. Take your time, enjoy the process, and trust your eye—you can always tweak until it feels perfect.
Apply Adhesive and Set Pieces
Now it's time to secure your design. Work in manageable patches so the adhesive doesn't skin over before you can embed the pieces. Following the manufacturer's guidance, apply a thin, even coat either directly onto the tabletop or onto the back of each shard—buttering the back often gives you better control. Press each fragment down gently and give it a slight twist to settle it into the glue, then use a small spirit level or a straight scrap of wood to check that the surface stays flat across neighboring pieces. Keep a damp cloth handy and wipe away any adhesive that oozes up immediately; dried glue is much harder to remove later. Once every piece is in position, leave the table untouched for at least 24 hours, or whatever the product label recommends, so the bond fully cures before you move on to grouting.
Grout and Clean the Mosaic
Now that your pieces are securely set, it’s time to grout for that smooth, finished look. If you’re using powdered grout, mix it with water until it reaches a peanut-butter consistency — thick yet spreadable. Pre-mixed grout can go straight from the tub, which is wonderfully convenient.
Grab a grout float and spread the grout diagonally across the mosaic. Press firmly to pack every gap. Don’t stress about covering the tile surfaces; you’ll remove the excess soon.
Let the grout set for about 15 to 30 minutes. When a hazy film appears on the pieces, it’s time to clean. Use a damp sponge (not soaking) and wipe gently on a diagonal to lift the excess. Rinse the sponge frequently so you’re not spreading grout back across the design. Be careful not to press too hard or you might scoop grout out of the lines. For any tiny crevices that need a little extra help, a soft toothbrush works wonders.
Once you’re satisfied, let the grout cure for 48 hours before sealing. This patience gives you a durable, water-resistant surface that’ll stand up to balcony weather beautifully.
Seal and Weatherproof for Balcony Use
Your mosaic looks stunning, but a balcony table faces sun, rain, and temperature swings that can dull colors and weaken grout over time. To keep it vibrant, apply two to three thin coats of a clear outdoor sealant across the entire top and grout lines, waiting for each coat to dry completely before adding the next. This builds a durable shield without clouding the design. If the edges or underside of the tabletop are exposed, give them a coat too—moisture can sneak in from any angle. For the base, stick on some rubber feet to lift it slightly off the floor; this prevents water from pooling underneath and causing damage. In direct sun or harsh weather, plan to re-seal once a year, ideally before summer, to maintain that fresh, glossy finish and protect all your hard work.
Style Your New Mosaic Table on the Balcony
Congratulations! Your broken plate mosaic table is now a vibrant centerpiece for your balcony. Here’s how to weave it into your outdoor haven.
Start by pairing the table with a cozy seat. Choose a weather-resistant outdoor cushion in a hue pulled from the mosaic—maybe a bright turquoise or sunny yellow—and place it on a simple wooden bench or folding chair. This invites you to linger with morning coffee or a good book.
Though the tabletop is a work of art, it can also double as a plant stand. Cluster a few small terracotta pots of succulents or your favorite kitchen herbs on one side. The mosaic’s colors will pop against the greenery, and the table’s edges keep everything tidy. Just rotate the pots occasionally so they get even sun, and use saucers to catch any water drips.
As dusk falls, a bit of soft lighting transforms your balcony into a magical retreat. Drape solar-powered string lights along the railing above the table, or place a small storm lantern on the mosaic surface. The broken plate pieces catch and reflect the glow, creating a twinkling, intimate atmosphere perfect for unwinding after a long day.
To keep your masterpiece in top shape, it’s wise to protect the grout from coffee rings or red wine spills. Keep a decorative lacquered tray or a set of coasters handy. When serving drinks, simply slide the tray onto the table—it adds another layer of color and ensures your mosaic stays stain-free and easy to wipe down.
With these simple touches, your mosaic table becomes more than just a surface—it’s the heart of your personal balcony oasis.
FAQ
Can I use any type of plate for a mosaic table?
Not exactly. Thick porcelain or ceramic plates work best because they are durable and cut into clean shards with nice color. Thin or delicate plates often shatter unpredictably, and metallic-edged ones may not adhere well.
Is a mosaic table safe for outdoor use?
Yes, if properly sealed. Use weather-resistant adhesives and grout, and apply a penetrating sealer over the finished piece to protect against rain and UV rays. Keep in mind that extreme temperature swings can cause materials to expand and contract, so some maintenance might be needed over time.
How do I cut plates into mosaic pieces safely?
Always wear safety goggles and thick work gloves. Use a tile nipper to cut along the edge in small bites, or score with a glass cutter and snap with running pliers. Work over a drop cloth to contain sharp fragments and smooth rough edges with a rubbing stone.
What grout is best for outdoor mosaic projects?
Epoxy-based grout is ideal because it's stain-resistant, less prone to cracking, and withstands moisture and temperature changes better than cement-based options. Make sure to choose a grout labeled for exterior use.
Can I mosaic over a metal table?
Definitely. Lightly sand the metal surface to create texture, then apply a rust-inhibiting primer before using a strong construction adhesive suitable for metal. This helps the tiles bond securely and prevents corrosion underneath.
How do I clean a mosaic table without damaging the grout?
Use a soft cloth or sponge with warm water and a pH-neutral cleaner. Avoid harsh chemicals or abrasive scrubbers, which can weaken or scratch the grout. For outdoor tables, rinse gently with a hose and dry with a microfiber towel to prevent water spots.